Working with Documentation
We write documentation in plain text that utilizes the reStructured Text markup language. You can compile it to HTML with Sphinx, and you can also read it as plain text.
Reading Documentation
You’re welcome to read the plain text documentation in this folder, but you’ll probably enjoy the pretty HTML version more. We use GitHub Actions to build the HTML and deploy it to GitHub Pages here: https://covertlab.github.io/vivarium-ecoli.
If you want to generate the HTML documentation yourself, check out the instructions on building documentation below.
Writing Documentation
Where to Write
API Reference Documentation
We currently mostly have API reference documentation. The API reference is auto-generated from docstrings in the code. These docstrings can take advantage of all the reStructuredText syntax we use elsewhere in Vivarium. Eventually, we will remove from the reference material the stubs for functions that aren’t user-facing and the auto-generated titles on each page.
Note
- From the compiled HTML reference documentation, you can click on
[source]to see the source code, including the docstrings. This can be helpful for looking up reStructuredText syntax.
Warning
For each class, include at most one of the class and constructor docstrings. They are concatenated when the HTML is compiled, so you can provide either one.
class MyClass:
    '''This is the class docstring'''

    def __init__(self):
        '''This is the constructor docstring'''
The “API Reference” link in the sidebar of the documentation links to
the full API reference under reference/api/ which is generated
automatically. The “Processes,” “Composites,” and “Experiments” links
are to curated tables of contents under reference/ that point to the
generated pages in reference/api/. This lets us highlight the
processes, composites, and experiments that we hope other people will
use.
Note
If you add a process, composite, or experiment, remember to add it to the curated tables of contents too.
Note
Many files are excluded from documentation auto-generation by
docs/confg.py because they don’t have headers in their
docstrings. These headers are required by Sphinx for a page to be
included in a table of contents.
Tutorials
We use Jupyter notebooks under notebooks/ for our tutorials. When
the documentation is compiled, these notebooks are copied into
docs/notebooks/ and transformed into HTML. This HTML is rendered as
pages under the “Tutorials” link in the sidebar.
Warning
Sphinx relies on the header levels in the notebook being correct. These headers are incorporated into the table of contents. Therefore, each notebook should have exactly one level-one header at the top.
Pointers for Technical Writing
Here are resources for writing good documentation and technical writing in general:
Quick Overview of reStructuredText Syntax
This is just a quick overview of some of the reStructuredText (reST) features you might use most often. For a more complete introduction, see:
reST Is not Markdown
Before we get started, remember that reStructuredText is not markdown!. For example, a common error is to try and use back-ticks for inline preformatted text like this:
`preformatted text`
However, in reStructuredText, this produces italicized text: preformatted text. For preformatted code, you need to use double back-ticks:
``preformatted text``
This code creates text like this: preformatted text.
Here are some other useful markup features:
Inline Markup
Italics:
*this text is italicized*This gets rendered as:
this text is italicized
Bold:
**this text is bold**This gets rendered as:
this text is bold
Preformatted:
``this text is preformatted``This gets rendered as:
this text is preformattedLinks:
`this is a link <https://example.com>`_
This gets rendered as:
Block Elements
For block elements, it’s important to remember that just like Python, reST cares about indentation.
Paragraphs are just blocks of text separated from other text by blank lines. These get rendered as paragraphs that are separated by space from each other, but they are not indented.
Code blocks begin with
.. code-block::and are then indented after a blank line. For example:.. code-block:: python def my_function(text): print(text)
This code block gets rendered like this:
def my_function(text):
    print(text)
The string after
.. code-block::specifies the language and is used for syntax highlighting. The block defaults to Python, so specifytextif you don’t want any highlighting.Images can be included like this:
.. image:: ./_static/ecoli_master_topology.png
    :width: 100%
    :alt: A graph with blue, database symbol nodes at the top and
       orange, square nodes on the bottom. The blue nodes are connected
       by solid edges, while the orange nodes are connected to the blue
       nodes by broken edges.
This would be rendered like this:
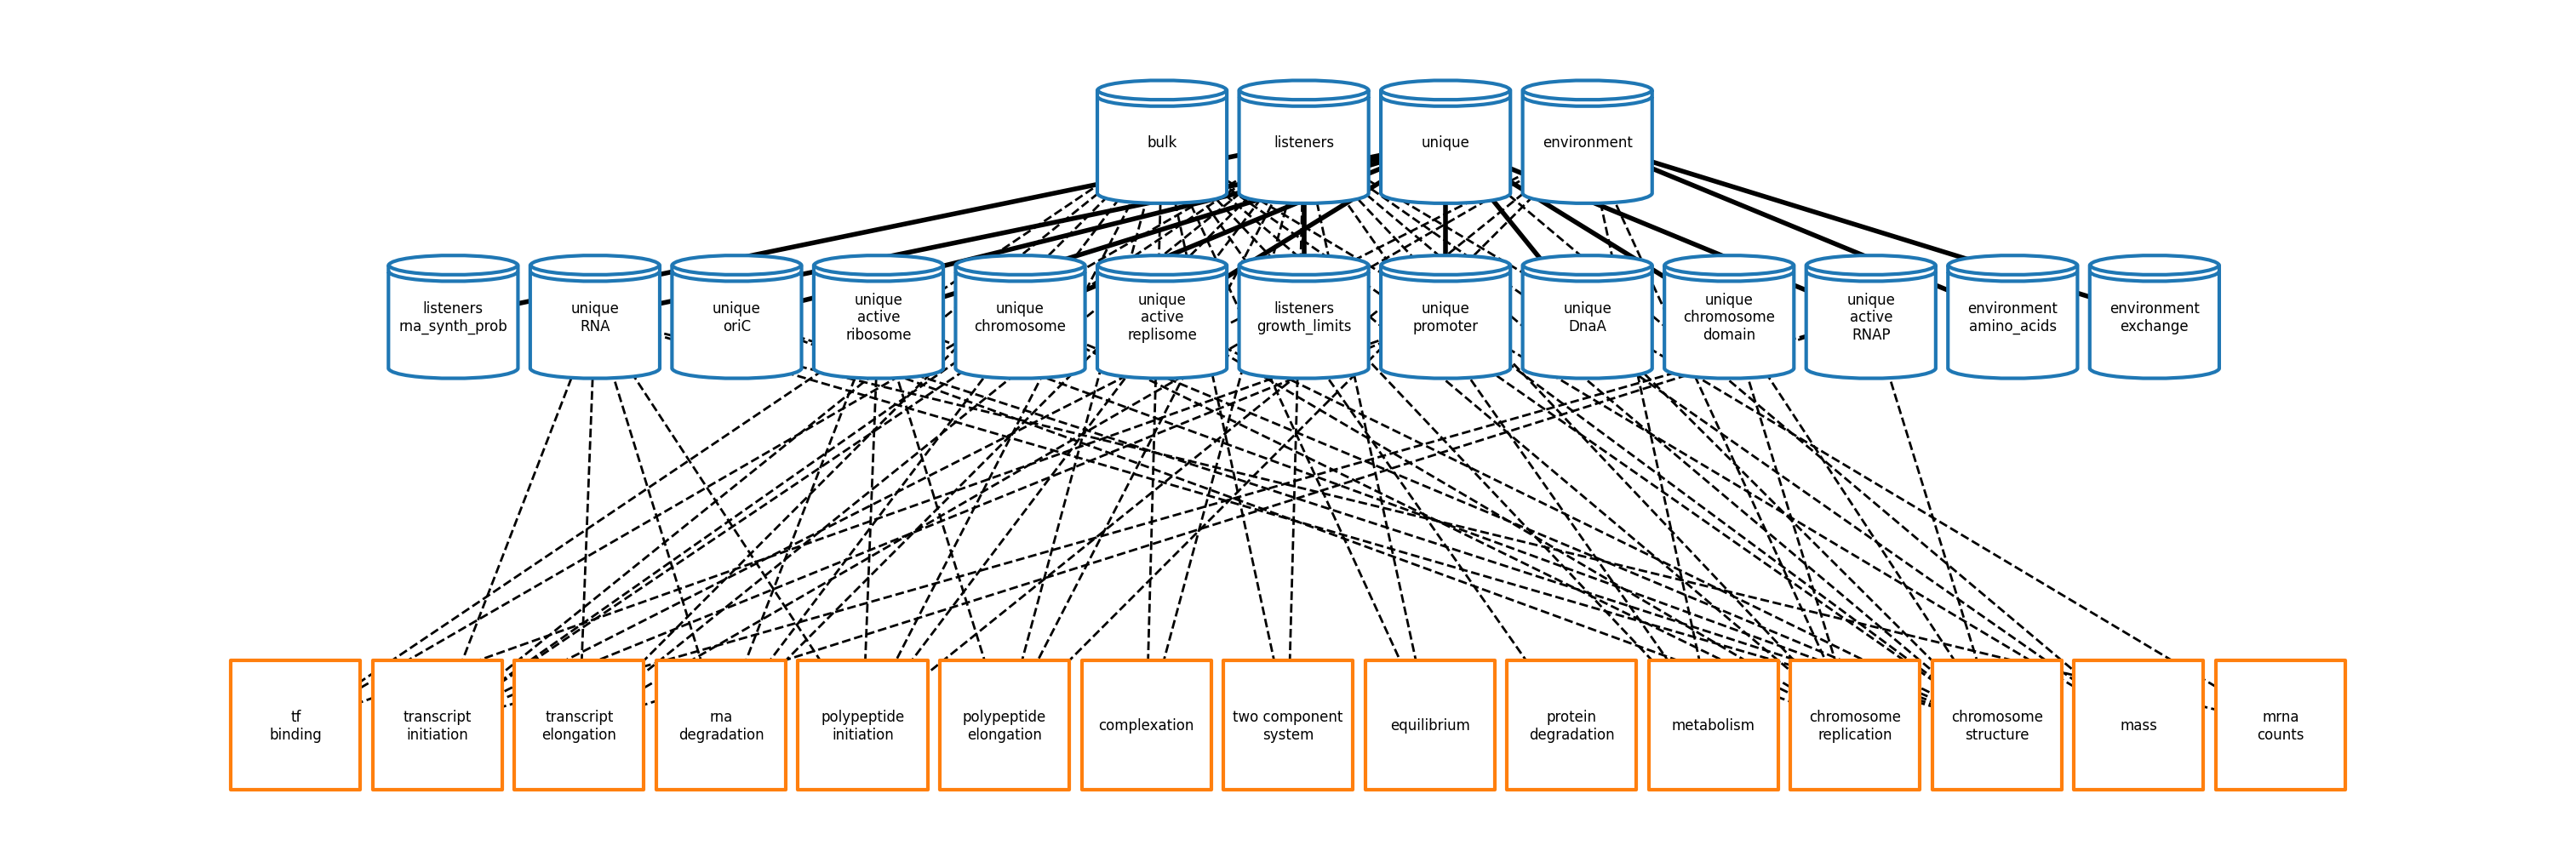
The
:width:argument specifies the width of the image, and the:alt:provides alt text for people who can’t see the image (e.g. blind users).Doctest blocks are blocks of Python code from an interactive Python session. For example:
>>> print('Hello, world!')
Hello, world!
>>> def hello():
...     print('Hello')
>>> hello()
Hello
This would be rendered as:
>>> print('Hello, world!')
Hello, world!
>>> def hello():
...     print('Hello')
>>> hello()
Hello
Pytest can also be configured so that it runs these code snippets as tests. This helps make sure that the examples in your documentation are always up to date!
Quoted blocks are created by just indenting:
Here is a quote:

  My words of wisdom.

This comes after the quote.
This gets rendered as:
Here is a quote:
My words of wisdom.
This comes after the quote.
Headings
reST handles headings in an unusual way. Unlike markdown or HTML where there is a heading syntax for each level of heading, reST determines heading order based on the order in which they appear. Any punctuation character can be used to underline or overline text to make that text a heading. For example, these all work:
=======
Heading
=======

Heading
=======

Heading
*******

Heading
^^^^^^^

-------
Heading
-------
We usually stick to using = and - characters with the headings
in this order:
===============
Level 1 Heading
===============

---------------
Level 2 Heading
---------------

Level 3 Heading
===============

Level 4 Heading
---------------
Note that the heading must be at least as long as the text!
Lists
Unordered lists use asterisks:
* Item 1
* Item 2
* Item 3, which is really long
  and spans multiple lines.
* Item 4
This gets rendered as:
Item 1
Item 2
Item 3, which is really long and spans multiple lines.
Item 4
Ordered lists can use numbers:
1. Item 1
2. Item 2
3. Item 3, which is really long
   and spans multiple lines.
4. Item 4
This gets rendered as:
Item 1
Item 2
Item 3, which is really long and spans multiple lines.
Item 4
Ordered lists can also figure out the numbers automatically:
#. Item 1
#. Item 2
#. Item 3, which is really long
   and spans multiple lines.
#. Item 4
This gets rendered as:
Item 1
Item 2
Item 3, which is really long and spans multiple lines.
Item 4
Lists can be nested, but they must be indented and separated from other levels of nesting by blank lines:
* Item 1

  * Item 2

* Item 3, which is really long
  and spans multiple lines.
* Item 4
This gets rendered as:
Item 1
Item 2
Item 3, which is really long and spans multiple lines.
Item 4
Math
You can render math using LaTeX either inline or as a block:
Inline:
:math:`x = \frac{1}{2}`
This gets rendered as: \(x = \frac{1}{2}\).
Block:
.. math::

   x = \frac{1}{2}
This gets rendered as:
\[x = \frac{1}{2}\]
Admonitions
Admonitions are like banners that highlight important points for the reader. For example:
.. note:: This is a really important note.
This looks like:
Note
This is a really important note!
The style guide below lists which admonitions we use.
Style Guide
Here we document the stylistic decisions we have made for this documentation:
We use first-person plural pronouns to refer to ourselves (e.g. “We decided”).
We write tutorials in the second-person, future tense, for example “First, you’ll need to install”. We also frequently use the imperative (“Install this”).
We use the following admonitions. We don’t want to overload our users with admonitions, so we don’t use any others.
We warn users about potential problems with warning admonitions. These often describe important steps that we think users might forget.
Warning
.. WARNING::We use notes to highlight important points. These should not be used for asides that aren’t important enough to integrate directly into the text.
Note
.. note::We give users helpful tips using the tip admonition. These help highlight tips that some users might not use but that will help users who are debugging problems.
Tip
.. tip::We use danger admonitions for the most critical warnings. Use these sparingly.
Danger
.. DANGER::
Building the Documentation
To build the documentation, we will use Sphinx to generate HTML files from plain text. Here are stepwise instructions:
(optional) Create a virtual environment for the documentation-building packages. You might want this to be separate from the environment you use for the rest of Vivarium E. coli.
Setup Vivarium E. coli. We need it to be setup so that we can import its Cython code.
Install dependencies:
$ pip install -r doc/requirements.txt
Build the HTML!
$ cd doc
$ make html
Your HTML will now be in
doc/_build/html. To view it, opendoc/_build/html/index.htmlin a web browser.